Build Your Own Kayak Cart
Please Note: This cart was originally designed for sit-on-top kayaks.
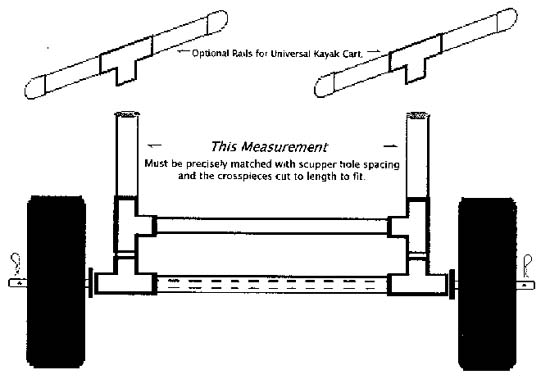
The cart pictured in the lower part of the drawing will only work
on sit-on-top kayaks with parallel (scupper) drain holes. Adding
the optional
rails shown in the upper part of the drawing and a strap to hold
the boat in place will result in a cart that works for almost any
model of kayak or canoe.
Parts List:
2 each Wheels on plastic rims with 3/4" bore*
* Wheels may be purchased directly from Northern Tool & Equipment
Company
at
Key Word search: low speed tire
3 feet 3/4" Aluminum stock, round
6 feet 3/4 inch SCH 40 PVC Pipe
4 each 3/4" PVC "T" glue fittings
2 each 3/4" PVC 3/4" x 1/2" glue reducers
2 each Cotter pins
2 Ounces PVC Primer
2 Ounces PVC Cement
OPTIONAL REINFORCEMENT
2 each 12 " x 3/4" dowel
8 Ounces Silicone sealant
UNIVERSAL KAYAK/CANOE CART ADD:
2 each 3/4" PVC glue "T" fittings
4 each 3/4" PVC caps
1 foot 1 1/4 " rubber hose cut to 4 - 3" lengths
4 each 1" webbing "Tri-Glide" (terminal ends)
1 each 6' tie down strap
Instructions:
Step 1: Cut two piece of the 3/4" PVC pipe 2" long.
Step 2: Use each short piece to glue on the 3/4" "T" fittings
together to for the foundation for each side. One "T" is glued to
the center opening and the other "T" is
glued to one of the end openings. Before the glue sets, push the assembly
firmly against a flat surface to align the fittings.
Step 3: Cut two 9" lengths from the 3/4" pipe to for the uprights
and glue these to what will become the upper end of the previously
glued side pieces
Step 4: Glue a 3/4" reducer fitting, into each of the lower T fittings.
This creates a sleeve where the axle will pass through the frame.
Step 5: (Optional) If you intend to use the cart as a wheelbarrow
to transport heavy loads (like dive gear for example) you should either
use the heavier schedule 80 PVC "T" fittings or reinforce the frame
with 3/4" dowels set into the upright side pieces. The dowels will
fit somewhat loosely into the PVC pipe and so should be inserted in
a generous bedding of silicone sealant, particularly around the "T" fittings.
Leave enough room above the lower "T" fittings
(the one that the axle sleeve was glued into) for the axle to cross.
This dowel will reinforce the T fittings for carrying heavy loads.
Step 6: Carefully measure the inside distance between the scupper
holes of the boat you intend to carry.
Step 7: Cut the two crosspieces to precisely match the measured
distance.
Step 8: Glue both measured crosspiece length to one side of
the frame assembly.
Step 9: Glue the other (unattached) side of the frame assembly
on to side with the measured lengths of pipe and immediately insert
the vertical pieces into the scupper holes of the kayak to be carried.
Before the glue sets, you can adjust the joints slightly so that the
frame slides easily into the scupper holes. If too wide, you can pull
it apart before the glue sets and shorten the crosspieces slightly
and try again until you achieve a good fit.
Step 10: Drill a hole through the axle 1/2" in from the end
to accept your cotter pin.
Step 11: Slide one wheel over the axle and then insert the axle
into one of the 3/4" x 1/2" reducer sleeves and out the other side.
Step 12: Slide the other wheel on the axle shaft and mark it
where you will drill a hole for the other cotter pin. Remove the wheel
and drill the second cotter pin hole.
Step 13: Cut the axle 1/2" beyond the second cotter pin hole.
Step 14: Reinsert the axle through the sleeves, slide the second
wheel back in place and insert the cotter pin.
Step 15: (Optional- if you want to use the cart as a "Universal" kayak/canoe
carrier) Add the optional rails shown on the drawing. You should add
loops of webbing (not shown) at each end of the top bars. This will
help to support the kayak and also keep the uprights from being pushed
apart under load. The universal cart will require a tie down strap
to keep the kayak in place and depending on the hull shape. may require
rubber hose on the rails to reduce the kayaks tendency to slide on
the rails. The 1 1/4" X 3" lengths
of rubber hose is installed over each end of the rails to provide
cushioning and to reduce slipping.
Notes: Don't be discouraged if your first attempt isn't perfect.
It might be a good idea to go ahead and pick up double the number
of PVC fittings needed so that if you aren't satisfied with your first
attempt you can jump right in and make any needed corrections. If
you notice that the wheels don't turn freely, check to see if the
tire inflation valve stems are hitting the cotter pins. If this happens,
simply remove the wheels and reinstall them on the axle with the valve
stems facing inward. (away from the cotter pins).
For the sit-on-top
version, you might want to consider smoothing the ends of vertical
pieces of pipe and adding some rubber "donuts" over the verticals
so that the kayak rests against something soft. You can be as creative
as you like with this plan but I would encourage the builder to follow
the plans the first time. The optional wooden dowels can also be inserted
into the uprights to reinforce the PVC "T" fittings
after assembly. To do this, squirt a very generous amount of silicone
sealant into each end of the uprights before you slide the dowel in.
I believe that the pneumatic tires on plastic rims are the best for the cart.
They ride smoothly over rough surfaces and easily over soft sand.
Also the plastic rims are unaffected by salt water. I wouldn't advise
anything else unless you will only use the cart on smooth, hard surfaces
and in fresh water. I hope you have found these instructions useful.
Any suggestions to improvement or alterations are (more or less) welcome.
--contributed by
Dave Martin, Noyo Pacific Outfitters |