

|
|
||||
| Home | Shops | FAQ | Site Map | ||
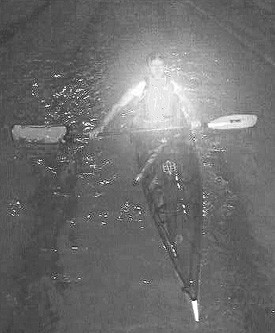
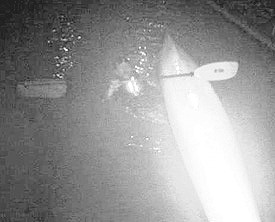 Once the float is firmly fastened to the paddle, set the paddle on the hull at a 90 degree angle to the boat. |
The
paddle-float assisted re-entry & roll is a user-friendly variation on
a conventional self-rescue technique. It involves re-entering an
overturned kayak and then using a paddle float to pull yourself back
upright. Unlike the conventional re-entry & roll and the Eskimo roll, this technique can be learned in one session and does not require as much practice to remain reliable. The float-assisted re-entry and roll also has important advantages over the conventional paddle float self-rescue: (1) many find it easier (2) it gets you back upright and out of the water very quickly and (3) because it keeps the your center of gravity low at all times, it can more easily be performed in rough seas. For those whose Eskimo roll is less than bombproof, it may become the self-rescue of choice. It is especially appropriate for those kayakers with short, narrow cockpits that make the standard paddle float entry difficult. The one disadvantage of this rescue is that results in a fair amount of water sloshing around in the cockpit - and pumping will usually be necessary. The details: After performing a wet exit and resurfacing, "store" your paddle between your legs, hold onto your still overturned kayak with one hand, and retrieve your paddle float with the other. Slip the paddle float over one blade of your paddle (either will work just fine) and fully inflate. If you haven't already done so, orient yourself toward the bow of your overturned boat. (If bow and stern are difficult to distinguish, look for the footrest bolts that protrude from the hull on most kayaks). If you are right-handed, it will normally be easiest to roll up from the right side of your boat. While facing the bow and holding onto the midsection of your kayak with your left hand, use your right hand to extend the bare end of your paddle over the top of the overturned hull, and extend the float out at a 90-degree angle to the kayak. Extend the float as far out as possible while still having the paddle shaft (rather than the blade) resting on the hull. With your left hand, locate the cockpit coaming. Then lift your legs and slide them into the submerged cockpit. It will be necessary to partially rotate the cockpit toward you in order to do this. If you are fairly flexible, you'll be able to locate the footrests with your feet. This is the initial setup position for this roll. Your head is above the water. Your left hand is on the cockpit coaming. Your right hand continues to hold the paddle shaft out at a 90-degree angle. Your legs have partially rotated the cockpit toward you and help maintain the right angle between paddle and boat. Now comes the fun part. Take a breath as you move your left hand from the cockpit coaming to the paddle shaft. Then immediately move your right hand off the paddle shaft and reach for the far side (the right side) of your cockpit coaming. You will need to dunk your head and hang upside down from your kayak in order to do this. Your right hand grasps the coaming and pulls your hips squarely into the seat, simultaneously rotating the kayak toward you. Be sure to get your feet solidly on the footpegs. Your thighs and knees should also be solidly under the deck. Now release your right hand from the coaming and retake your previous grip on the paddle shaft. Pull down on the paddle shaft with your right hand, just enough to raise your head above water. Congratulations! You have now done the difficult part. The roll itself is easy to do because the paddle float provides such good leverage - and if done with even minimal form (think head dink, hip snap, lay back), it requires very little arm strength. When you are ready to roll, drive your lower knee and hips up out of the water, drop your head toward the water, and pull firmly downward on the paddle shaft with your right hand. If your first attempt fails, just lower yourself back into the water, take a breath and try again. Be sure not to roll too vigorously or you may go right up and right over on the opposite side. Once upright, keep your paddle float inflated until you have finished pumping out and have refastened your spray deck. In rough water, you may want to pump with the paddle shaft trapped between your chest and the back of your forearm, using the paddle float for balance. |
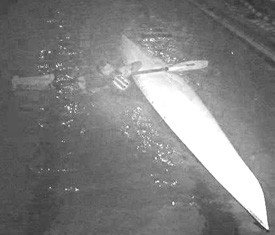 Bring your legs up on your left side and angle them into the still inverted cockpit. | |
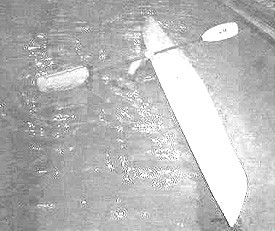 Maintaining a grip on your paddle with your left hand, dunk your head and right shoulder, grasp the far side of your cockpit coaming with your right hand, and pull your hips into the seat. | |
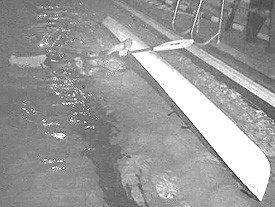 Place your right hand back on the paddle shaft and lift your head for a nice breath of air. | |
 Drive your hips and dink your head, while pulling down on the paddle shaft and, voila, it's time to reapply the sunscreen. | |
| Tips: The 90-degree angle is a key part of this maneuver. If you don't maintain this angle, the paddle can slide off the hull. Visualize and practice the sequence in which you dunk your head into the water, hang beneath your kayak, and pull your hips into the cockpit. Physically this move is not that difficult, but it is counter-intuitive for those of us who spend most of our lives "right side up." Keeping the boat fully inverted (rather than rotating it over on its side) as you slide your feet into the cockpit may help reduce the amount of water in the cockpit when you roll back up. Stow your paddle float in a secure but easily accessible place between uses. Leaving a few puffs of air in the float will prevent it from sinking if you accidentally drop it before inflating. And for those who paddle alone, a backup paddle float is a good idea. Variations: The concept described above - re-entering your overturned boat and using leverage to pull yourself back up can take a variety of different forms. If another kayak is immediately nearby and conditions are calm, have the paddler bring her kayak parallel to your own boat at a distance of just over three feet (or slightly more if you're tall). Place your paddle over the overturned hull of your boat and over the upright hull of the assisting boat. Dunk under to enter your cockpit and then pull up as in the previous version. Another technique using another kayak for assistance is to stow your paddle, re-enter your cockpit while holding the bow of the assisting boat with your left hand, and then roll yourself up using both hands on the bow of the assisting boat. This concept can also be applied to an all-in rescue situation. It is equally easy to re-enter and roll up using the bow of an overturned kayak for leverage. Still another variation that's fun to practice involves stowing your paddle and using your paddle float held in your right hand for leverage. Iniate a hip flick while holding the paddle float extended at a 90 degree angle from the boat with your right hand. Then lay back to complete this roll. The more ways you have to get up out of the water, the safer you'll be, and the more fun you'll have. Practicing these techniques and inventing your own variations can be pretty fun in itself. by: Ray Wirth Return to Water Walker Articles Return to Articles Return Home |
|